Gang, we have a big problem right now here at Whitevale, and its NOT people neglecting to repair ball marks. It's ball marks being repaired incorrectly, and its turned into a cancer that is consuming our greens.
I need every one's help on this! We have had 5 people working on fixing incorrectly repaired ball marks for the past few weeks, and I don't think we are making any head way.
It should take about 15 seconds to properly fix a ball mark if you do it correctly. If you do it wrong, it takes us at lest four times longer to repair it.
I want to go through some very simple steps to refresh all members on how it needs to be done!

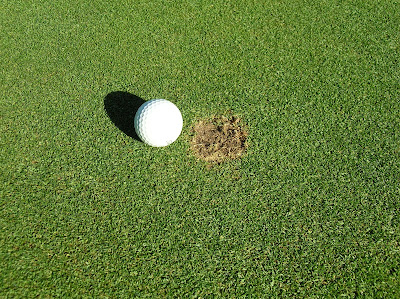
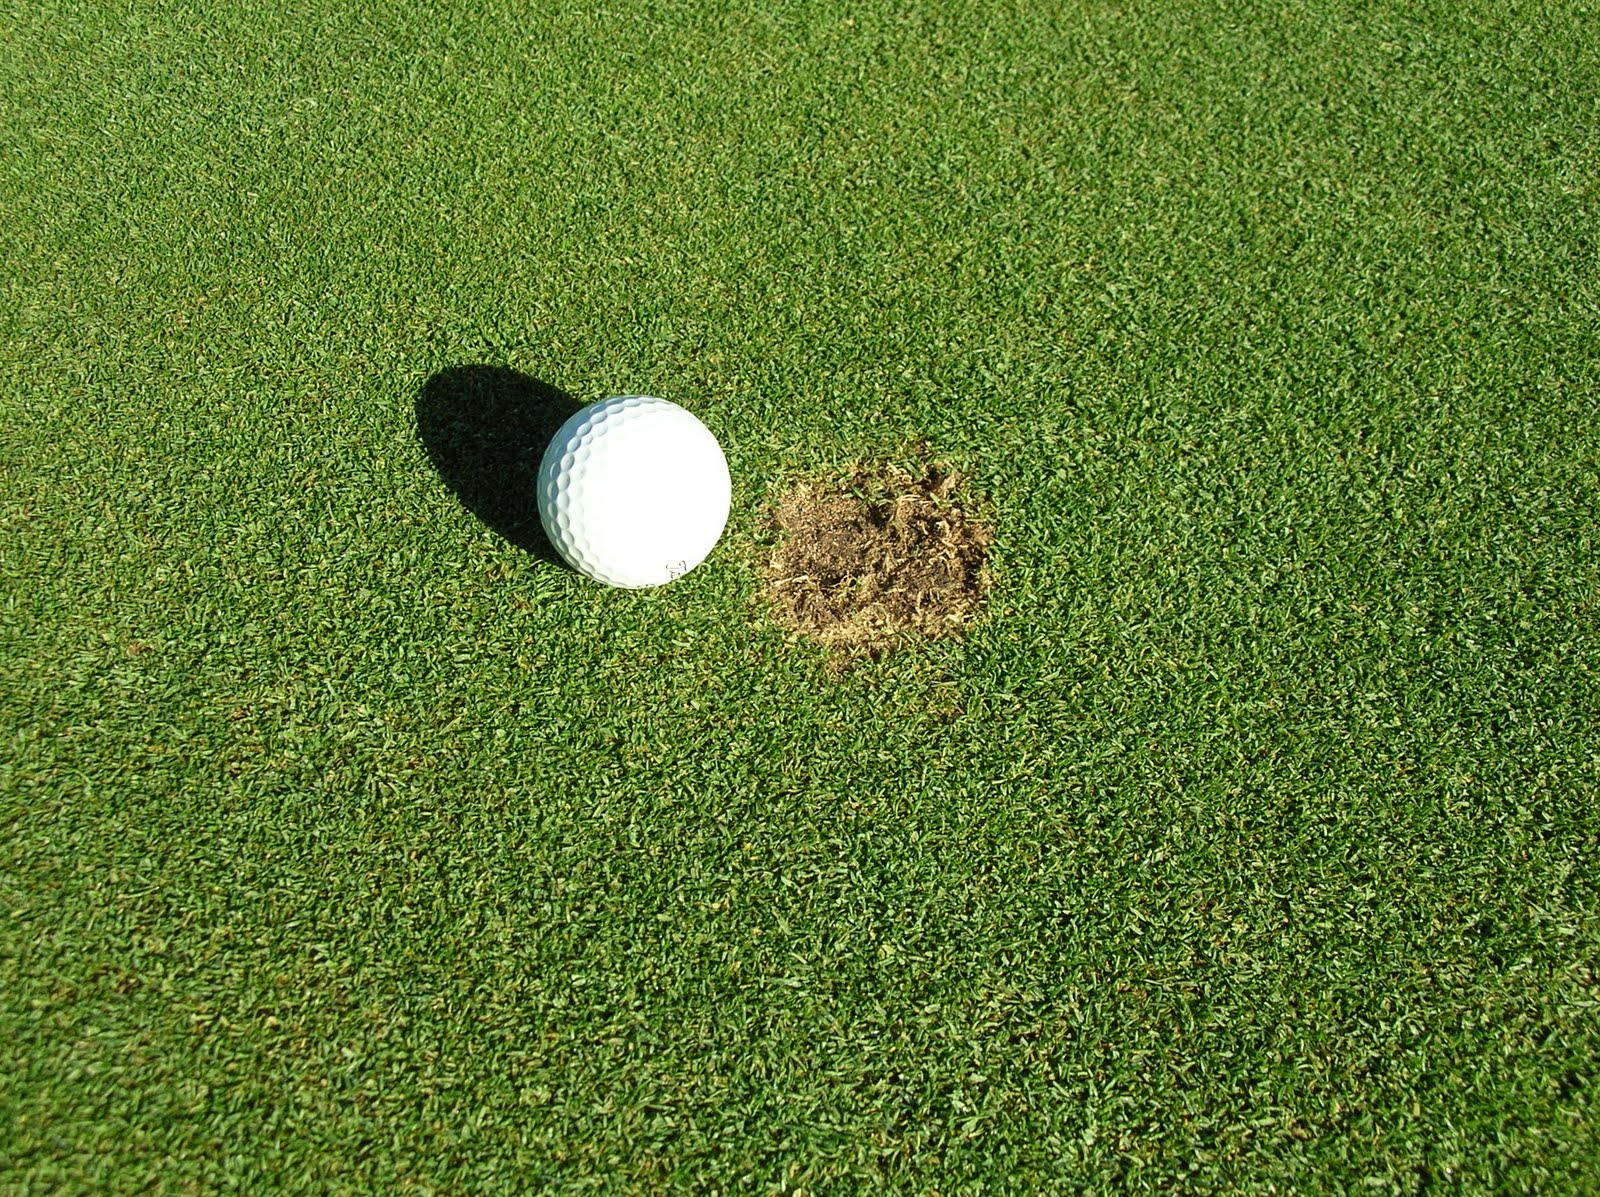
Lesson 1. If your ball mark looks like this after you have fixed it, please stop fixing your ball marks!! You are doing it wrong! There should be turf, not soil showing when you are complete.
Very simply someone lifted up the center of this ball mark bringing the soil to the surface. Although level and puttable, this will take more than a month to fill in under optimal growing conditions!
The only thing worse than that mark.........................is this,

This ball mark was also lifted up in the center, but then it was NOT tapped down FIRMLY with the bottom of a putter. The result is the greens mower scalping even more of the turf as we mow over this high spot.
So here we go......Lesson 2

Have a ball mark repair tool always, this is a much heavier duty tool I use because it is so much easier to hold onto, but, it still has the simple two prongs.

So here is a good example of a ball mark which someone lifted up the center bringing the soil to the surface, The first thing I do here is to actually dig a bit of the soil out and throw it into the blue grass so it has the dimple that all ball marks leave.
Lesson 3, insert repair tool on an angle beside the mark, making sure there is grass between the prongs and the visible soil.

Next, move the TOP of the repair tool (the part you are holding onto) toward the mark.
Sometimes a GENTLE twisting motion helps. What we are accomplishing here is stretching the surrounding turf toward the mark.

Do this on both sides of your mark. Usually multiple times, on both sides, moving the ball marker further out stretching turf as far as 3 inches from the actual mark, towards the damaged area. The turf will stretch with a little work.


Don't be concerned if the grass you are stretching toward the mark opens up a little hole behind your tool. Just keep mowing grass further out, back towards the mark.

If the center is high, and soil is near the surface use the prongs on their side and push that soil straight down.

Don't be afraid to use your thumbs to help knit the turf, and level it down toward to center of the mark.

If its good for the left side, you know its good for the right side!

Continue your ball mark tool to stretch the turf and you thumbs to work it how you want it.
So, not pretty, but we have closed up 95% of the improperly repaired mark.........you can see I have stretched turf from 3 or so inches away, toward the mark.
But, WE ARE NOT DONE!! if you walk away now, all your work will be WORSE than having done nothing! Working the turf the way we have has left the entire area slightly high.

It must be tapped down with the bottom of your putter. Do it many times as this area is much larger than the bottom of your putter, so move it around and keep tamping. Don't be afraid of using too much down force, firm is the key to success!! And don't bother stepping on it, the soft spikes will stop the bottom of your shoe from leveling and firming the area!

It must be tapped down with the bottom of your putter. Do it many times as this area is much larger than the bottom of your putter, so move it around and keep tamping. Don't be afraid of using too much down force, firm is the key to success!! And don't bother stepping on it, the soft spikes will stop the bottom of your shoe from leveling and firming the area!

So here is my finished repair. And your right, its not perfect (mostly because this was not a fresh ball mark). We actually have a small seed bottle we use to add seed to this area to help the recovery! So there we have it. see the before picture below.
So here is a refresher of key points.
1. NEVER, NEVER, NEVER lift up the center of you ball mark!
2. Work the surrounding turf in toward the center of the ball mark.
3. Don't just move the turf that is within a half inch of the mark, keep moving out stretching the grass much further out toward your ball mark.
4. Always firmly tap the entire area with the bottom of your putter!
5. MOST IMPORTANTLY, IF YOU ARE UNSURE, OR THE MARK DOES NOT LOOK LIKE OUR FINISHED PRODUCT, PLEASE DON'T REPAIR YOUR BALL MARK!
No comments:
Post a Comment